Few things are more frustrating for a popcorn enthusiast than a stubborn stirring rod in their beloved popcorn maker. That vital component, designed to evenly distribute kernels and prevent burning, can sometimes seize up, putting a halt to movie nights and snack times. If you’ve ever faced this predicament, you know the struggle is real. But don’t let a stuck stirring rod ruin your popcorn experience. This guide will walk you through common causes, essential tools, and effective, safe methods to get your popcorn maker back in perfect working order, ensuring every batch pops just right.
Why Do Popcorn Maker Stirring Rods Get Stuck?
A stirring rod can become immovable for several reasons, often related to the delicious ingredients we use. Understanding the culprit is the first step toward a successful fix.
Food Residue Buildup
|
Our Picks for the Best Popcorn maker in 2026
As an Amazon Associate I earn from qualifying purchases.
|
||
| Num | Product | Action |
|---|---|---|
| 1 | Black Vintage Commercial Popcorn Machine with Cart & Warmer Light - 12oz Stainless Steel Popper Makes 60 Cups for Theater, Parties & Home Use |

|
| 2 | Dash Fresh Pop Popcorn Maker - Oil-Free, Air Popcorn Popper - With Measuring Cup & Recipe Guide - Perfect for Movie Nights - 16 Cups, Red |
|
| 3 | West Bend Stir Crazy Hot Oil Popcorn Popper, Popcorn Maker Machine with Large Serving Bowl Lid and Stirring Rod Perfect for Movie Night Snack Time or Parties, 6-Quart, Red |
|
| 4 | VEVOR Commercial Popcorn Machine, 8 Oz Kettle, 850 W Countertop Popcorn Maker for 48 Cups per Batch, Theater Style Popper with 3-Switch Control Steel Frame Tempered Glass Doors 2 Scoops 2 Spoons, Red |
|
| 5 | Hot Air Popper Popcorn Maker, 1200W Popcorn Machine, 4.5-Quart Air Popper for Family Movie Nights, Popcorn Popper, Fast 2-Min Popcorn Maker Machine, Popcorn Popper |
|
| 6 | Dash Fresh Pop Popcorn Maker - Oil-Free, Air Popcorn Popper - With Measuring Cup & Recipe Guide - Perfect for Movie Nights - 16 Cups, White |
|
| 7 | Presto 04863 Poplite Hot Air Popcorn Popper - Built-In Measuring Cup + Melts Butter, Easy to Clean, Built-In Cord Wrap, 18 Cups, Red |
|
| 8 | Original Whirley Pop Popcorn Maker - Wabash Valley Farms Gourmet Popcorn Popper, Aluminum Pot With Nylon Gears, 3-Minute Stove Top Popper, Home Movie Night (Silver) |
|
| 9 | Dash Fresh Pop Popcorn Maker - Oil-Free, Air Popcorn Popper - With Measuring Cup & Recipe Guide - Perfect for Movie Nights - 16 Cups, Aqua |
|
| 10 | Dash SmartStore Deluxe Stirring Popcorn Maker - Hot Oil Electric Popcorn Popper with Butter-Warming Tray, Clear Serving Bowl, Storage Lid & Measuring Cup - 24 Cups, Red |
|
This is by far the most common reason. Over time, leftover oil, melted butter, sugar, and even tiny fragments of unpopped kernels can accumulate and harden around the stirring rod’s base or pivot points. This sticky, crusted residue acts like a strong adhesive, effectively gluing the rod in place. Sugary popcorn glazes are particularly notorious for creating this stubborn bond.
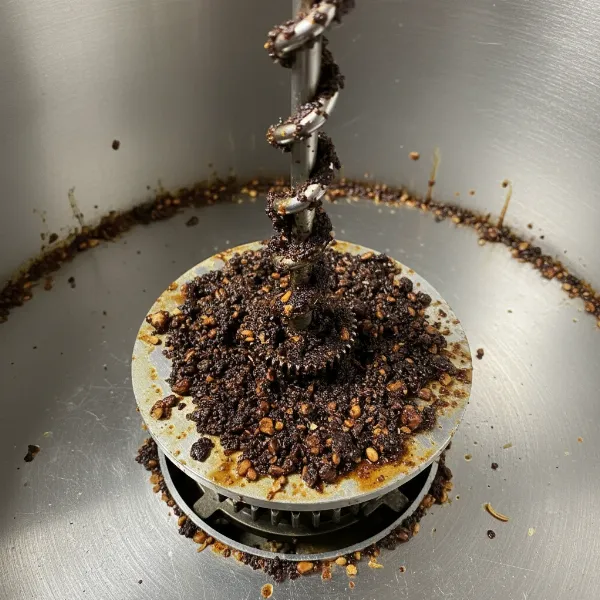 Close-up of a popcorn maker stirring rod stuck with hardened food residue.
Mineral Deposits and Corrosion
If water is frequently used for cleaning and not thoroughly dried, or if the popcorn maker is left uncleaned for extended periods, mineral deposits from hard water can form. In some cases, especially with dissimilar metals in contact, minor corrosion can occur, causing components to seize. This is less frequent than food residue but can happen with neglect.
Tight Fit or Manufacturing Tolerances
Occasionally, a stirring rod might simply be a very tight fit from the factory or has slightly expanded/contracted with temperature changes over its lifespan. While not a defect, it can make removal challenging.
Over-tightening or Misalignment
If your popcorn maker’s stirring rod is designed to be removable, over-tightening during reassembly can cause it to bind. Similarly, if it was reinserted at a slight angle, it might get wedged rather than freely moving.
Tools You Might Need
Before you start, gather a few basic items. Having these on hand will make the process smoother and safer.
- Rubber Gloves or Jar Openers: Essential for a better grip without slipping.
- Warm, Soapy Water: A gentle yet effective cleaner for loosening food residue.
- Mild Degreaser: For tough, greasy buildup.
- Soft Brush or Sponge: To scrub away grime without scratching.
- Microfiber Cloths: For cleaning and drying.
- Padded Pliers (Optional): For extreme cases, but always use with caution and padding to prevent damage.
- Wooden or Rubber Mallet (Optional): Again, for very stubborn situations, used with extreme care.
Step-by-Step Guide: How to Fix a Stuck Stirring Rod
Safety is paramount when working with any appliance. Always start with these crucial precautions.
1. Safety First: Unplug and Cool Down
Before attempting any repairs or cleaning, ensure your popcorn maker is completely unplugged from the power outlet. Allow it to cool down fully, especially if it was recently used. Attempting to fix a hot machine is dangerous and can lead to burns.
2. Initial Gentle Wiggle and Twist
Sometimes, all it needs is a little encouragement. With a firm grip, try to gently wiggle the stirring rod back and forth while simultaneously attempting to twist it (if it’s designed to rotate or be removed). Avoid applying excessive force that could bend or break the rod.
3. Apply Heat and Moisture
For hardened food residue, heat and moisture are your best allies.
- Warm, Damp Cloth: Dampen a clean cloth with very warm, soapy water. Wring out any excess. Wrap the cloth around the base of the stirring rod, where it connects to the machine, and let it sit for 10-15 minutes. The warmth will help soften hardened sugars and oils, and the soap will start to break down grease.
- Steam (Caution!): If your machine has a removable pot, you can carefully place a small amount of water in it and heat it gently on a stovetop (without the rod attached, if possible) to create steam. Then, after unplugging and ensuring safety, the ambient warmth and steam might help loosen the residue around the rod’s base if it’s permanently attached. Never apply steam directly to electrical components.
4. Use a Mild Degreaser
If warm water isn’t enough, a kitchen-safe degreaser can be effective. Apply a small amount of degreaser to a cloth and carefully wipe it around the stuck area of the stirring rod. Let it sit for the recommended time (check product instructions) before gently trying to wiggle and twist the rod again. Always rinse thoroughly afterward to remove any chemical residue.
5. Increase Your Grip
A lack of grip can make a simple stuck rod feel impossible to move.
- Rubber Gloves: Wearing rubber kitchen gloves can significantly improve your traction.
- Rubber Jar Openers/Non-slip Mats: These provide an excellent non-slip surface. Wrap a piece of a rubber jar opener around the stirring rod for a firmer hold.
6. Controlled Force (With Caution!)
When the above steps haven’t worked, and you’re confident the issue is just stubborn residue, you can apply more controlled force.
- Body Strength (Thighs): As some experts suggest for other stuck rods, you can use the strength of your leg muscles. If the stirring rod is long enough, grip the rod firmly with both hands, place the base of the machine (or the part where the rod is stuck) between your knees, and use your outer thighs to push against your hands while pulling gently but steadily. This provides a straight, powerful pull.
- Padded Pliers/Mallet (Last Resort): Only consider these if other methods fail and you’re dealing with a robust, metal stirring rod. Crucially, always pad the stirring rod with a thick cloth or rubber before using pliers to avoid scratching or deforming the metal. For a very stubborn, seized rod, a gentle tap with a wooden or rubber mallet (again, using a cloth for protection) might break the bond, but this carries a higher risk of damage. Exercise extreme caution.
“A stuck stirring rod is often a sign that your popcorn maker is asking for a little more love and attention. Regular cleaning is the simplest and most effective preventative measure.” – Admin, PopcornMakerPro.com
7. Disassembly (If Applicable)
Some popcorn makers allow for partial disassembly of the stirring mechanism. Consult your appliance’s user manual. If the manual provides instructions for removing or cleaning the stirring rod’s components, follow them carefully. This might expose the true source of the jam, such as a clogged gear.
Preventing Future Stuck Stirring Rods
Prevention is always better than cure. A few simple habits can save you a lot of hassle.
Clean Immediately After Use
Don’t let residue harden. As soon as the popcorn maker cools down, wipe down the stirring rod and the entire interior with a damp, soapy cloth. This prevents buildup from becoming a problem.
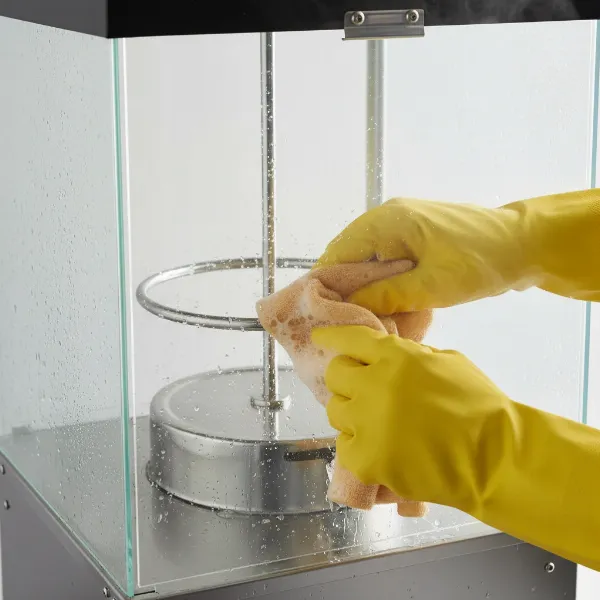 Hand cleaning a popcorn maker stirring rod with a soapy cloth after use.
Regular Deep Cleaning
Even with immediate cleaning, a deeper clean every few uses is beneficial. Use a mild degreaser or a vinegar solution (check your manual for compatibility) to break down any invisible buildup. Ensure all parts are thoroughly rinsed and dried before storing or next use.
Proper Assembly and Disassembly
If your stirring rod is removable, ensure you reassemble it correctly and don’t overtighten any fasteners. A slight misalignment can lead to binding.
Using Recommended Ingredients
While experimentation is fun, sticking to the oils and kernels recommended by your popcorn maker’s manufacturer can sometimes help prevent excessive residue buildup, as these are formulated to work best with the machine’s design.
When to Call a Professional or Consider Replacement
There are times when a DIY fix isn’t the answer. If you’ve tried all the gentle methods and are still met with resistance, or if you notice any damage (like a bent rod or stripped gears) while attempting the repair, it might be time to seek professional help. If the cost of repair outweighs the cost of a new popcorn maker, or if the machine is old and prone to other issues, replacing it might be the most practical solution.
Conclusion
A stuck stirring rod doesn’t have to signal the end of your popcorn maker’s life. By understanding the common causes and employing a methodical, gentle approach with the right tools, you can often free the rod and restore your appliance to full functionality. Remember, consistent cleaning and proper maintenance are your best defense against future sticking issues, ensuring you can enjoy perfectly popped popcorn batch after batch. What’s your go-to method for keeping your popcorn maker running smoothly?
Frequently Asked Questions
Can I use WD-40 or similar penetrating oils on my popcorn maker?
No, it is generally not recommended to use WD-40 or industrial penetrating oils on food-contact appliances like popcorn makers. These products are not food-safe and can leave behind residues that are harmful if ingested. Stick to food-safe degreasers, warm soapy water, or natural solutions like vinegar for cleaning.
How often should I clean my popcorn maker’s stirring rod?
Ideally, the stirring rod and the entire Popcorn Maker should be wiped down immediately after each use, once it has cooled, to prevent residue buildup. For a deeper clean, especially if you use sugary glazes or flavored oils, a thorough cleaning every 3-5 uses is advisable to maintain optimal performance and prevent sticking.
What kind of oil is best to prevent sticking in my popcorn maker?
To minimize residue and sticking, use high-quality popcorn oils that are designed for high heat and leave less carbonization. Coconut oil is a popular choice for its flavor and relatively clean burn. Avoid using oils with added sugars or artificial flavors directly in the popping chamber, as these are more likely to cause sticky buildup.